14. Customizing ParaView
ParaView can be customized in a number of ways to tailor it to your
preferences and needs. Customization options include setting general
application behavior, customizing default property values used for filters,
representations, and views, and customizing aspects of the paraview client.
This chapter describes the different ways to customize ParaView.
14.1. Settings
As with any large application, paraview provides mechanisms to customize some
of its application behavior. These are referred to as application
settings . or just settings. Such settings can be changed using the Settings dialog,
which is accessed from the Edit > Settings menu (ParaView >
Preferences on the Mac). We have seen parts of this dialog earlier, e.g., in
Section 1.2,
Section 8.14.1, and Section 8.14.4. In
this section, we will take a closer look at some of the other options available
in this dialog.
The Settings dialog is split into several tabs. The General tab
consolidates most of the miscellaneous settings. The Camera tab enables you
to change the mouse interaction mappings for the Render View and similar
views. The Render View tab, which we saw earlier in Section 8.14.1
and Section 8.14.4, provides options in regards to rendering in
Render View and similar views. The Color Palette tab is used to change
the active color palette.
Using this dialog is not much different than the Properties panel. You have
the Search box at the top, which allows you to search properties matching
the input text ( Section 1.1.2). The
 button can be used to toggle between default and
advanced modes.
button can be used to toggle between default and
advanced modes.
To apply the changes made to any of the settings, use the Apply or OK
buttons. OK will apply the changes and close the dialog, while Cancel
will reject any changes made and close the dialog. Any changes made to
the options in this dialog are persistent across sessions. That is, the next time you
launch paraview, you’ll still be using the same settings chosen earlier. To
revert to the default, use the Restore Defaults button. You can also manually
edit the setting file as in Section 14.3.1.
Furthermore, site maintainers can provide site-wide defaults for these, as is
explained in Section 14.4.
Next, we will see some of the important options available. Those that are only
available in the advanced mode are indicated as such using the
icon. You will either need to toggle on the
advanced options with the button or search for the
option using the Search box.
14.1.1. General settings
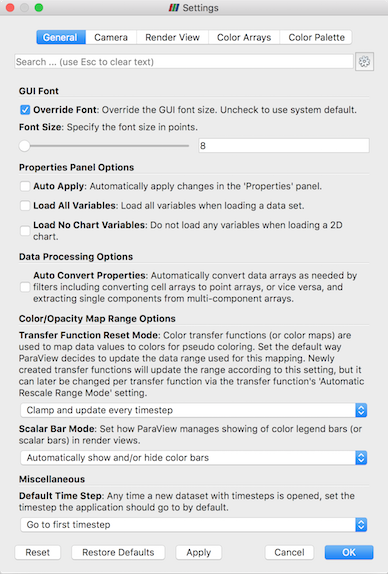
Fig. 14.1 Settings dialog in paraview showing the General settings tab.
General OptionsShow Welcome Dialog: Uncheck this to not show the welcome screen at application startup. You will need to restartparaviewto see the effect.Show Save State On Exit: When this is checkedparaviewwill prompt you to save a state file when you exit the application.Crash Recovery: When this is checked,paraviewwill intermittently save a backup state file as you make changes in the visualization pipeline. Ifparaviewcrashes for some reason, then when you relaunchparaview, it will provide you with a choice to load the backup state saved before the crash occurred. This is not \(100\%\) reliable, but some users may find it useful to avoid losing their visualization state due to a crash.Force Single Column Menus: On platforms that support multicolumn menus, ensure all menu items are selectable on low-resolution screens.
GUI FontOverride Font: When checked, use a custom font size for the user interface. This overrides the system default font size.Font Size: The size of the font to use for UI elements.
View OptionsDefault View Type: Whenparaviewstarts up, it createsRender Viewby default. You can use this option to change the type of the view that is created by default, instead of theRender View. You can even pickNoneif you don’t want to create any view by default.
Properties Panel OptionsAuto Apply: When checked, thePropertiespanel will automatically apply any changes you make to the properties without requiring you to click theApplybutton. The same setting can also be toggled using the button in the Main Controlstoolbar.Auto Apply Active Only: This limits the auto-applying to the properties on the active source alone.Properties Panel Mode: This allows you to split thePropertiespanel into separate panels as described in Section 1.2.
Data Processing OptionsAuto Convert Properties: Several filters only work on one type of array, e.g., point data arrays or cell data arrays. Before using such filters, you are expected to apply thePoint Data To Cell DataorCell Data To Point Datafilters. To avoid having to add these filters explicitly, you can check this checkbox. When checked, ParaView will automatically convert data arrays as needed by filters, including converting cell array to point arrays and vice-versa, as well as extracting a single component from a multi-component array.
Color/Opacity Map Range OptionsTransfer Function Reset Mode: This setting controls the initial settings for how ParaView will reset the ranges for color and opacity maps (or transfer functions). This sets the initial value of theAutomatic Rescale Range Modefor newly created color/opacity maps ( Section 4.2.2). This setting can be changed on a per-color map basis after the color map has been created.Scalar Bar Mode: This settings controls howparaviewmanages showing the color legend (or scalar bar) inRender Viewand similar views.
Default Time StepWhenever a dataset with timesteps is opened, this setting controls howparaviewwill update the current time shown by the application. You can choose betweenLeave current time unchanged, if possible,Go to first timestep, andGo to last timestep.AnimationCache Geometry For Animation: This enables caching of geometry when playing animations to attempt to speed up animation playback in a loop. When caching is enabled, data ranges reported by theInformationpanel and others can be incorrect, since the pipeline may not have updated.Animation Geometry Cache Limit: When animation caching is enabled, this setting controls how much geometry (in kilobytes) can be cached by any rank. As soon as a rank’s cache size reaches this limit, ParaView will no longer cache the remaining timesteps.Animation Time Notation: Sets the display notation for the time in the annotation toolbar. Options areMixed,Scientific, andFixed.Animation Time Precision: Sets the number of digits displayed in the time in the animation toolbar.
Maximum Number of Data Representation LabelsWhen a selection is labeled by data attributes this is the maximum number of labels to use. When the number of points/cells to label is above this value then a subset of this many will be labeled instead. Too many overlapping labels becomes illegible, so this is set to 100 by default.
14.1.2. Camera settings
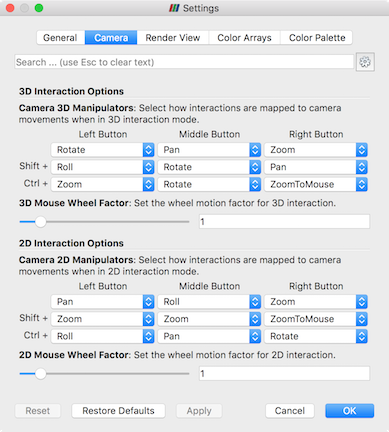
Fig. 14.2 Settings dialog in paraview showing the Camera settings tab with the
default fields.
This tab allows you to configure how you interact with 3D and 2D views in ParaView. You
can customize the mapping between mouse buttons and keyboard modifiers to camera interaction
types, such as Rotate, Pan, Zoom, and others. The mappings are defined
separately for 3D and 2D interaction modes. You can reassign these controls by setting
them to your desired mouse button (left, middle or right) and modifier combinations (no
modifier, ⇧ (shift), or CTRL/⌘).
The types of camera controls that can be assigned are: Pan, Zoom, Roll,
Rotate, Zoom To Mouse, Multi Rotate and Rotate Skybox.
Additionally, you can adjust the 2D and 3D mouse wheel factors, which control the zoom rate of the camera movements in their respective modes. There are also options to reverse the mouse wheel zoom direction, and to enable zooming to the cursor position instead of the center of the view.
Changes made in this dialog persist across sessions. You may reset to the default settings
by clicking the Restore Defaults button and then selecting Apply, or restore any
settings that were changed but not applied back to their prior state, by clicking the
Reset button.
For more details about camera interactions, read Section 5.4.2.2.
14.1.3. Render View settings
Refer to Section 8.14.1 and
Section 8.14.4 for various options available on the
Render View tab.
14.1.4. Color Palette
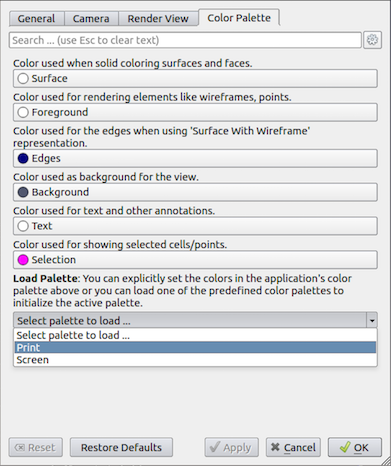
Fig. 14.3 Settings dialog in paraview showing the Color Palette settings tab.
The Color Palette tab ( Fig. 14.3)
allows you to change the colors in the active color
palette. The tab lists the available color categories Surface ,
Foreground ,
Edges ,
Background ,
Text , and Selection . You
can manually set colors to use for each of these categories or load one of the
predefined palettes using the Load Palette option. To understand
color palettes , let’s look at an example.
Let’s start paraview and split the active view to create two Render View
instances side by side. You may want to start paraview with the -dr
command line argument to stop any of your current settings from interfering
with this demo. Next, show Sphere as Wireframe in the view
on the left, and show Cone as Surface in the view on the right.
Also, turn on Cube Axis for Cone . You will see something like
Fig. 14.4 (top).
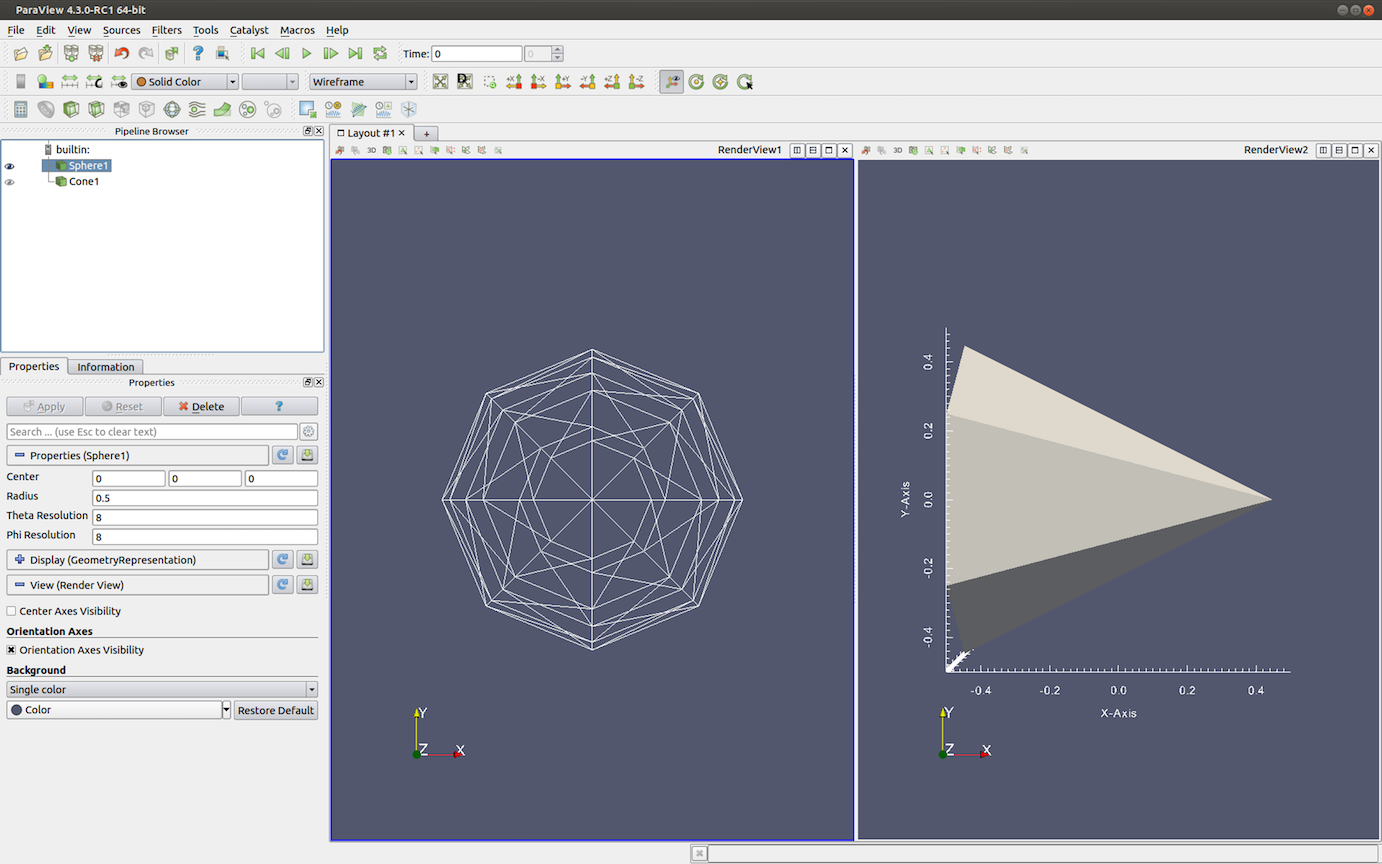
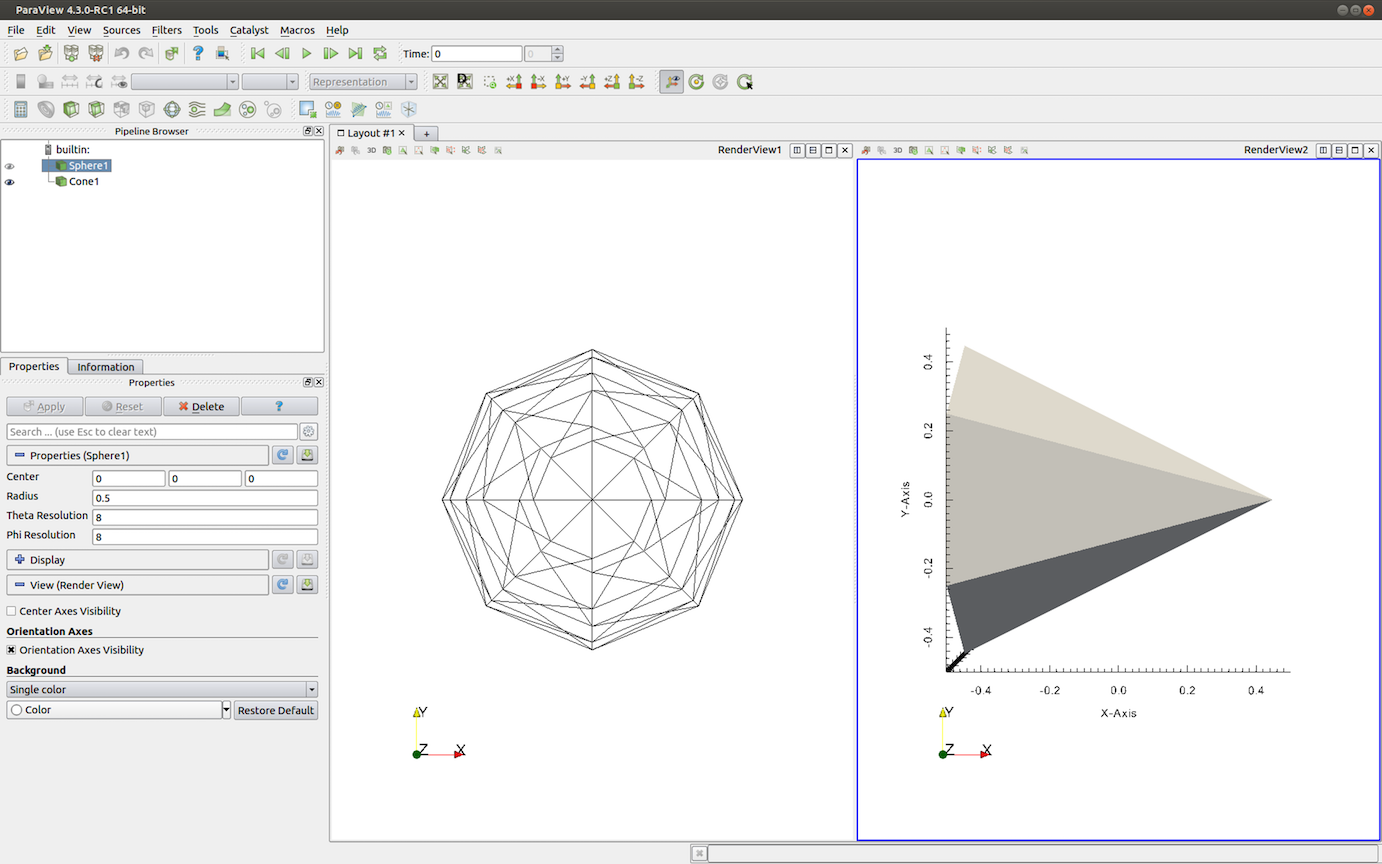
Fig. 14.4 The effect of loading the Print color palette as
the active palette. The top is the original visualization and the bottom shows the
result after loading the Print palette.
Now let’s say you want to generate an image for printing. Typically, for
printing, you’d want the background color to be white, while the wireframes and
annotations to be colored black. To do that, one way is to go change each of the
colors for each each of the views, displays and cube-axes. You can imagine how
tedious that will get especially with larger pipelines. Alternatively, using the
Settings dialog, change the active color palette to Print as shown in
Fig. 14.3 and then click OK or Apply .
The visualization will immediately change to something like
Fig. 14.4 (bottom).
Essentially, ParaView allows you to link any color property to one of
the color categories. When the color palette is changed, any color property
linked to a palette category will also be automatically updated to match the category color.
Fig. 14.5 shows how to link a color
property to a color palette category in the Properties panel. Use the tiny
drop-down menu marker to make the menu pop up that shows the color palette categories.
Select any one of them to link that property with the category. The link is
automatically severed if you manually change the color by simply clicking on the
button.
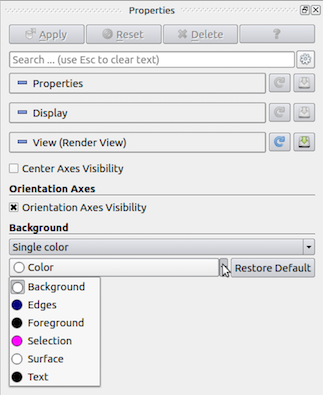
Fig. 14.5 Popup menu allows you to link a color property to a color palette
category in the Properties panel.}
14.2. Custom default settings
The section describes how to specify custom default settings for the properties of sources, readers, filters, representations, and views. This can be used to specify, for example, the default background color for new views, whether a gradient background should be used, the resolution of a sphere source, which data arrays to load from a particular file format, and the default setting for almost any other object property.
The same custom defaults are used across all the ParaView
executables. This means that custom defaults specified in the
paraview executable are also used as defaults in
pvpython and pvbatch, which makes it easier
to set up a visualization with paraview and use
pvpython or pvbatch to generate an animation
from time-series data, for example.
14.2.1. Customizing defaults for properties
The Properties panel in paraview has three sections,
Properties ,
Display , and View . Each section has two
buttons. These buttons are circled in red in
Fig. 14.6. The button with the disk
icon is used to save the current property values in that section that
have been applied with the Apply button. Property values that
have been changed but not applied with the Apply button will not
be saved as custom default settings.
The button with the circular arrow (or reload icon) is used to restore any custom property settings for the object to ParaView’s application defaults. Once you save the current property settings as defaults, those values will be treated as the defaults from then on until you change them to another value or reset them. The saved defaults are written to a configuration file so that they are available when you close and launch ParaView again.
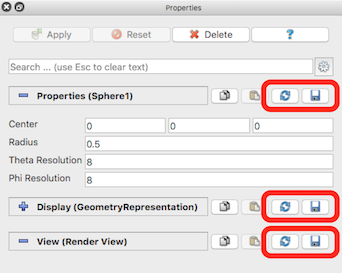
Fig. 14.6 Buttons for saving and restoring default property values in the Properties panel.
You can undo your changes to the default property values by clicking
on the reload button. This will reset the current view property values
to paraview’s application defaults. To fully restore
paraview’s default values, you need to click the save
button again. If you don’t, the restored default values will be
applied only to the current object, and new instances of that object
will have the custom default values that were saved the last time you
clicked the save button.
14.2.2. Example: specifying a custom background color
Suppose you want to change the default background color in the
Render View . To do this, scroll down to the View section of
the Properties panel and click on the combo box that shows the
current background color. Select a new color, and click OK . Next,
scroll up to the View (Render View) section header and click on
the disk button to the right of the header. This will save the new
background color as the default background color for new views. To see
this, click on the + sign next to the tab above the 3D view to
create a new layout. Click on the Render View button. A new
render view will be created with the custom background color you just
saved as default.
14.3. Configuration files
ParaView enables you to configure various aspects of its operation, from specifying default property values (described in :numref:sec:CustomDefaultSettings) to graphical interface organization. Some configuration options can be specified for all users on a system through site-wide configuration files while individual users can further customize ParaView with per-user configuration files.
14.3.1. Configuring settings with JSON
Some ParaView settings are stored in a text file in the JSON format.
We recommend to use the user interface in paraview to
set most default values, but it is possible to set them
by editing the JSON settings file directly. It is
always a good idea to make a backup copy of a settings file prior to
manual editing.
The ParaView executables read from and write to a file named
ParaView-UserSettings.json, which is located in your home
directory on your computer.
The search procedure is detailed in Section 14.4.
Notice
The JSON settings configuration is named depending on its location!
Use ParaView-SiteSettings.json file for the install locations,
and ParaView-UserSettings.json for the user space version.
This file will exist if you have made any default settings changes through the user
interface in the paraview executable. Once set, these
default settings will be available in subsequent versions of ParaView.
A simple example of a file that specifies custom default settings is shown below:
{
  "sources" : {
    "SphereSource" : {
      "Radius" : 3.5,
      "ThetaResolution" : 32
    },
    "CylinderSource" : {
      "Radius" : 2
    }
  },
  "views" : {
    "RenderView" : {
      "Background" : [0.0, 0.0, 0.0]
    }
  }
}
Note the hierarchical organization of the file. The first level of the hierarchy specifies the group to which the object whose settings are being specified refers (“sources” in this example). The second level names the object whose settings are being specified. Finally, the third level specifies the custom default settings themselves. Note that default values can be set to literal numbers, strings, or arrays (denoted by comma-separated literals in square brackets).
The names of groups and objects come from the XML proxy definition
files in ParaView’s source code in the directory
ParaView/ParaViewCore/ServerManager/SMApplication/Resources
(ParaView\ParaViewCore\ServerManager\SMApplication\Resources on Windows systems) . The
group name is defined by the name attribute in a
ProxyGroup element. The object name comes from the
name attribute in the Proxy element (or elements of
vtkSMProxy subclasses). The property names come from the
name attribute in the *Property XML elements for the
object.
Did you know?
The application-wide settings available in paraview
through the Edit > Settings menu are also saved to this user
settings file. Hence, if you have changed the application settings,
you will see some entries under a group named “settings”.
14.3.2. Configuring server settings
In addition to settings for ParaView, it is possible to
specify default values for pvserver, pvdataserver and pvrenderserver
command line options using server settings.
Server settings file is named ParaViewServer-UserSettings.json.
- Only the following connection command-line options can be specified:
--connect-id--hostname--client-host--reverse-connection--timeout--timeout-command--timeout-command-interval--bind-address
The expected formatting of the server settings file is as follows:
{
  "cli-options" : {
    "connection" : {
      "connect-id" : 17,
      "reverse-connection" : true,
      "client-host" : "bailey"
    }
  }
}
The name of the setting is the “long” version of the option, without the two leading dashes.
The server settings can only be set manually in the file and cannot be modified from the ParaView application.
Did you know?
The application-wide settings logic is also valid for server settings
and a ParaViewServer-SiteSettings.json in the locations
specified in the Section 14.4 will be used in the
same way.
14.3.3. Configuring application environment
For a smoother experience, the ParaView graphical application will also save and restore your environment: panel positions, recent files used and more.
This information is stored in a ParaViewX.Y.ini file (X.Y being the version numbers),
that will be written in your user space when ParaView exits.
This file is not intended to be edited from a text editor. It is more like a snapshot of the application organization the last time you close it.
14.3.4. Property Panel Visibilities
For an advanced control of the ParaView interface, a PropertyPanelVisibilities.json
can be provided either in user space or under a site directory,
in any of the directories mentioned in Section 14.4.
This file will override the visibility of any property to be either “default”, “advanced”, or “never”.
The structure of this JSON file is similar to the ParaView-UserSettings one:
it should should be a collection of object per proxy group, containing one object per proxy,
itself having a list of properties.
Example of PropertyPanelVisibilities.json
{
  "annotations" :
  {
    "GridAxes3DActor" :
    {
      "XTitle" : "advanced"
    }
  },
  "sources" :
  {
    "SphereSource" :
    {
      "StartTheta" : "default",
      "StartPhi" : "never"
    }
  }
}
ParaView does not generate this file, it is intended to be provided when deploying the application.
14.4. Configuration locations
Each configuration file can be located in several directory locations. ParaView expects a writable directory in the user space so that it can store user-customized settings files. Additional configuration files that apply to all users of a system can be configured as part of the ParaView installation process. These types of configuration files are called “site settings”.
14.4.1. User settings: configuration at the user level
The user space contains the files that can be written by the ParaView application. This also were you can add your own configurations.
On Windows, this is located at %APPDATA%/ParaView/, where the
APPDATA environment variable is usually something like
C:/Users/USERNAME/AppData/Roaming, where USERNAME is
your login name.
On Unix-like systems, it is located under $XDG_CONFIG_HOME/ParaView/
if defined or under $HOME/.config/ParaView/.
14.4.2. Site settings: configuration at installation level
The ParaView executables will search for the site settings file in
several locations. If you installed ParaView in the directory
INSTALL, then the ParaView executables will search for the
site settings file in these directories in the specified order:
INSTALLINSTALL/share/paraview-X.Y(INSTALL\share\paraview-X.Yin Windows systems)INSTALL/lib(INSTALL\libin Windows systems)INSTALL/..(INSTALL\..in Windows systems)
On macOS additional paths are searched. Considering a ROOT directory
at INSTALL/../../.., following paths are added:
ROOTROOT/../libINSTALL/../lib/paraview-X.YINSTALL/../SupportROOT/../Support
where X is ParaView’s major version number and Y is
the minor version number. ParaView executables will search these
directories in the given order, reading in the first
file it finds.
Did you know?
To aid in debugging problems with the site settings file location, you
can define the PARAVIEW_LOG_APPLICATION_VERBOSITY to INFO.
This will turn on verbose output about application configuration, including
showing where the ParaView executables are looking for the configuration files.