8. Saving Results
In this chapter, we will introduce various ways of saving visualization results in ParaView. Results generated throughout the visualization process not only include the images and the rendering results, but also include the datasets generated by filters, the scene representations that will be imported into other rendering applications, and the movies generated from animations.
8.1. Saving datasets
You can save the dataset produced by any pipeline module in ParaView, including
sources, readers, and filters. To save the dataset in paraview, begin
by selecting the pipeline module in the Pipeline browser to make it the
active source. For modules with multiple output ports, select the output port
producing the dataset of interest. To save the dataset, use the File > Save Data
menu or the  button in the
 Main Controls
toolbar. You can also use the keyboard shortcut CTRL + S (or ⌘ + S).
The Save File dialog (Fig. 8.1)
will allow you to select the filename and the file format.
The available list of file formats depends on the type of the dataset you are
trying to save.
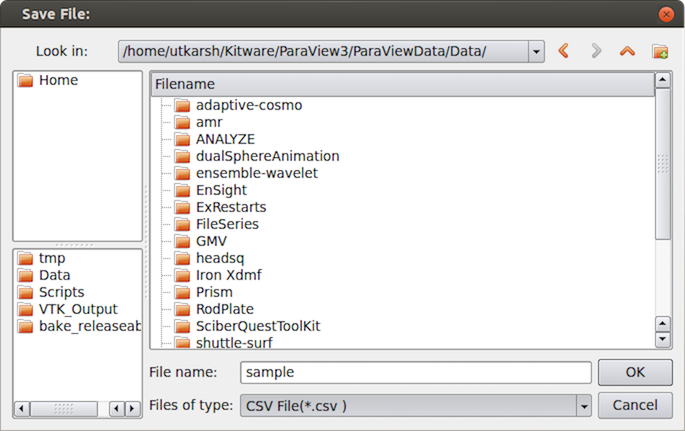
Fig. 8.1 Save File dialog in paraview.
On accepting a filename and file format to use, paraview may show
the Configure Writer dialog (Fig. 8.2).
This dialog allows you to further customize the
writing process. The properties shown in this dialog depend on the selected file
format and range from enabling you to Write All Time Steps , to selecting
the attributes to write in the output file.
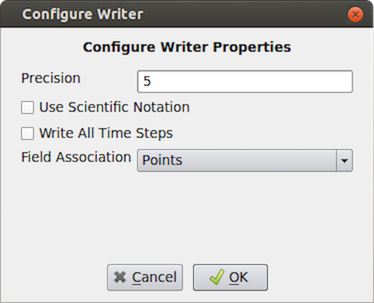
Fig. 8.2 Configure Writer dialog in paraview shown when saving a dataset as a csv file.
In pvpython too, you can save the datasets as follows:
# Saving the data using the default properties for
# the used writer, if any.
>>> SaveData("sample.csv", source)

# the second argument is optional, and refers to the pipeline module
# to write the data from. If none is specified the active source is used.

# To pass parameters to configure the writer
>>> SaveData("sample.csv", source,
             Precision=2,
             FieldAssociation='Cells')
pvpython will pick a writer based on the file extension and the dataset type
selected for writing, similar to what it does in paraview.
Admittedly, it can be tricky to figure out what options are available for the
writer. The best way is to use the Python tracing capabilities in
paraview and to use the generated sample script as a
reference ( Section 1.6.2).
Make sure you use a similar type of dataset and the same file format as
you want to use in your Python script, when tracing, to avoid runtime issues.
8.2. Saving rendered results
Views that render results (this includes almost all of the views, except
SpreadSheet View ) support saving images (or screenshots) in one of the
standard image formats (PNG, JPEG, TIFF, BMP, PPM).
Certain views also support exportings the results in several formats such as
PDF, X3D, and VRML.
8.2.1. Saving screenshots
To save the render image from a view in paraview,
use the File > Save Screenshot menu
option. When selected, a file dialog will appear where you can select the file path
and format to which the screenshot should be saved. After selecting the image file, the
Save
Screenshot Options
dialog (Fig. 8.3) will
be shown. This dialog allows you to select various parameters that controls what
image is saved out and how.
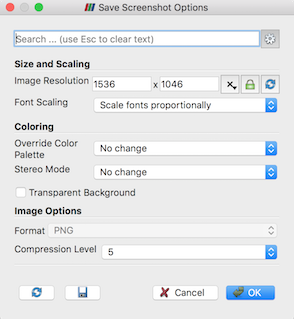
Fig. 8.3 The Save Screenshot Options dialog, which is used to customize saving screenshots in paraview.
If your visualization setup only has 1 view the active tab, then you’ll be presented with options shown in (Fig. 8.3). The available options are as follows.
Image Resolution: This is the target image resolution in pixels. By default, it is set to the current view dimensions. You can change it as needed. If the resolution larger than the current resolution, then ParaView will use tiling to render the full image in multiple stages. For reliable results, you may want to present the current aspect ratio. You can use Tools > Lock View Size Custom to lock the view size to a suitable aspect ratio.Font Scaling: When a resolution larger than the current resolution is specified, this allows you to control how the fonts are to be scaled. DefaultScale fonts proportionallytries to achieve WYSIWYG as long as the aspect ratio is maintained. This is suitable for saving images targeted for higher DPI (or PPI) display than your screen.Do not scale fontsmay be used to avoid font scaling and keep their size in pixels the same as what is currently on the screen. This is suitable for saving images targeted for a larger display with the same pixel resolution.Override Color Palette: Optionally change the color palette just for saving the screenshot using this drop-down.Stereo Mode: This option lets you save the image using one of the supported stereo modes.Transparent Background: If the file format supports it, you can check this option to save the images with a transparent background rather than the current background color.Format: This shows the file format selected in the file save dialog.
For formats that have different options like compression levels, format-specific
options are presented in the Save Screenshot Options dialog. The PNG format has
a Compression Level option that ranges from 0 (no compression) to 9 (maximum
compression). The JPEG format options are Quality , which ranges from 0 to 100,
and Progressive , which enables saving the file as a progressive JPEG. The TIFF
file format has a Compression option with possible values None , PackBits ,
and Deflate . The BMP file format has no options.
If the active tab has more than one view, then the Save
Screenshot Options dialog has a few more options as shown in
Fig. 8.4.
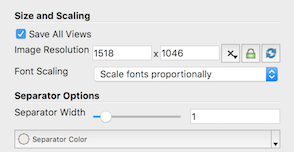
Fig. 8.4 Extra options in Save Screenshot Options dialog available when the active tab has more than 1 view.
Save All Views: Check this to save all the views in the active tab laid out exactly as in the UI. If unchecked, only the active view will be saved.Separator Options: These control the separator drawn between the views in the generated image. You can specify theSeparator Widthin approximate pixels as well as theSeparator Color.
To save a screenshot in pvpython, you use SaveScreenshot .
# Save a screenshot from a specific view.
>>> myview = GetActiveView()
>>> SaveScreenshot("aview.png", myview)

# Save all views in a tab
>>> layout = GetLayout()
>>> SaveScreenshot("allviews.png", layout)

# To save a specific target resolution, rather than using the
# the current view (or layout) size, and override the color palette.
>>> SaveScreenshot("aviewResolution.png", myview,
        ImageResolution=[1500, 1500],
        OverrideColorPalette="Black Background")
As always, you can use Python tracing in paraview to trace
the exact form of the method to use to save a specific screenshot image.
8.2.2. Exporting scenes
When available, you can export a visualization in a view in several of the
supported formats using the File > Export View menu option in
paraview. For a
Render View (or similar), the available formats include Cinema Database,
EPS, PDF, PS, SVG, POV, VRML, WebGL, X3D, and X3DB. On selecting a file
as which to export, paraview may pop up an Export Options dialog that
allows you to set up parameters for the exporter, similar to saving datasets
( Section 8.1).
In addition, from pvpython, exporting takes the following form (again,
just use Python trace to figure out the proper form – that’s the
easiest way).
>>> myview = GetActiveView()
>>> ExportView('/tmp/sample.svg', view=myview,
               Plottitle='ParaView GL2PS Export',
               Compressoutputfile=1)
# the arguments after 'view' depend on the exporter selected.
8.3. Saving animation

Fig. 8.5 The Save Animation Options dialog in paraview, which is used to customize saving of animation.
To save an animation as a series of images or a video file, you use the
File > Save Animation menu option. This pops up a file save dialog where you choose
where to save the file and which format to use. After selecting the file and format, the Save Animation Options
dialog (Fig. 8.5) is display. This dialog is nearly a clone of the
Save Screenshot Options dialog (Fig. 8.3), including,
optionally, the extra multiview options from Fig. 8.4,
with additional format-specific compression options and a few animation-specific parameters.
These are as follows:
Frame Rate: When saving the animation as a video file (AVI or Ogg) rather than a series of images, this lets you specify the frame rate for the generated video. It has no effect when saving as a series of images.Frame Window: If you didn’t want to save out the full animation, instead limit to a specific window, you can use this to specify the range of frames to save. If you are generating a animation from a temporal dataset with timesteps, the frame generally corresponds to the timestep number.
On accepting this dialog, you will be able to choose the output file location and format. The available file formats include AVI and Ogg (when available) video formats, as well as image formats such PNG, JPEG, and TIFF. If saving as images, ParaView will generate a series of image files sequentially numbered using the frame number as a suffix to the specified filename.
To save animations in pvpython, you use SaveAnimation . The arguments to this function are
same as the SaveScreenshot with additional parameters for the animation specific options.
>>> SaveAnimation('animation.avi', GetActiveView(),
      FrameWindow = [1, 100],
      FrameRate = 1)
8.4. Saving state
Besides saving the results produced by your visualization setup, you can save
the state of the visualization pipeline itself, including all the pipeline
modules, views, their layout, and their properties. This is referred to as the
Application State , or just
State . In paraview, you can save the
state using the File > Save State… menu option. Conversely, to load a saved
state file, you can use File > Load State….
There are two types of state files that you can save in paraview:
ParaView state file (*.pvsm) and Python state file (*.py). The
PVSM files are XML-based text files that are human and machine readable,
although not necessarily human friendly for a novice user. However, if you don’t
plan to read and make sense of the state files, PVSM is the most robust and
reliable way to save the application state. For those who want to save the state and then
modify it manually, using Python state files may be better, as using
Python trace simply traces the actions that you perform in the UI as a
Python script. Python state files, on the other hand, save the entire current state of the
application as a Python script that you can use in paraview or the
Python Shell .
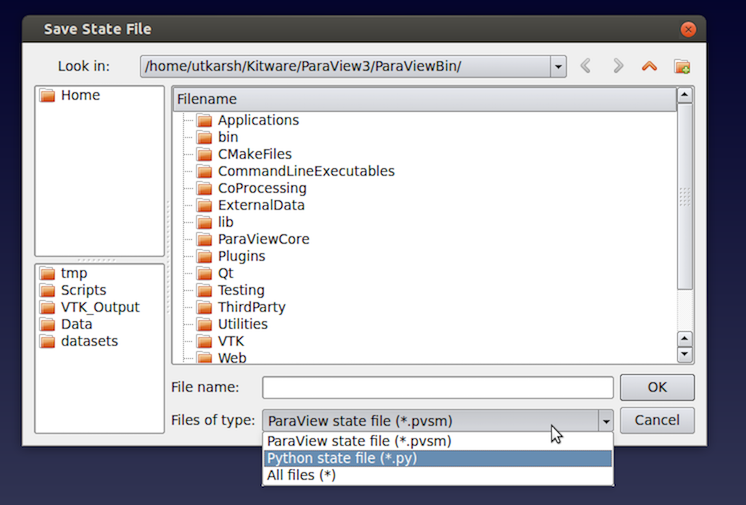
Fig. 8.6 The Save State File dialog in paraview.
To load a state file, you use the File > Load State… menu. Note that loading a state file will affect the current visualization state.
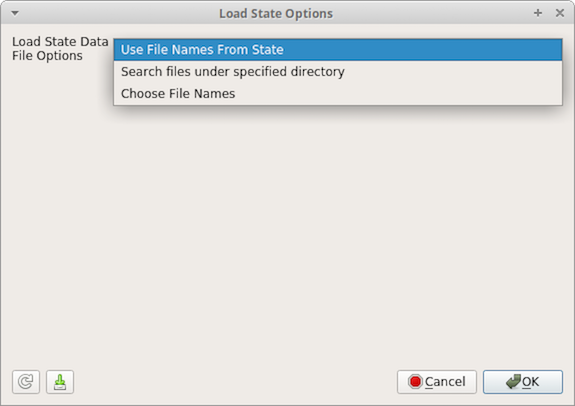
Fig. 8.7 The Load State Options dialog in paraview showing the options for where to find data files.
If you load a PVSM file this way you will be asked where
to search for the data files. There are three available options: Use File Names From State , Search files under
specified directory and Choose File Names . If you select Use File Names From State then ParaView will
look for the data at the absolute paths saved in the state file. If you select Search files under specified
directory then you will see an option to browse for a directory that ParaView will search for the files before
looking for them in the absolute path in the state file. This defaults to the
location of the state file to make sharing state files between computers easier. If you select
Choose File Names then you will be given a list of file names in the state file and can override
each one individually.
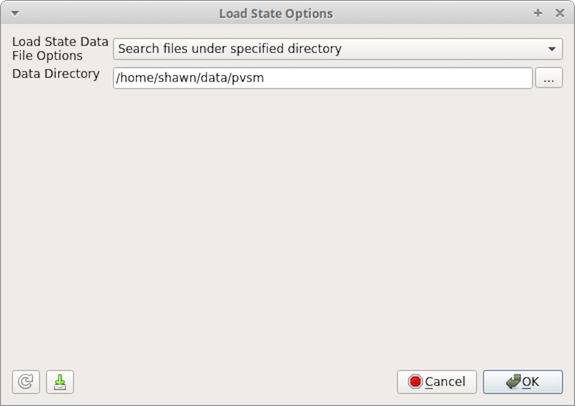
Fig. 8.8 The Load State Options dialog in paraview showing the Search files under specified directory option.
You can save/load the PVSM state file in pvpython as follows:
>>> from paraview.simple import *

# Save the PVSM state file. Currently, this doesn't support
# saving Python state files.
>>> SaveState("sample.pvsm")

# To load a PVSM state file.
>>> LoadState("sample.pvsm")
To replace all data files used by state with those under a specific directory, you use the following form:
>>> LoadState("sample.pvsm",
              data_directory="[directory path]",

              # optionally, restrict to specified directory
              restrict_to_data_directory=True)
The function signature can become a little more complex if you want to explicitly override filenames used in the state file. It may be easier to use the Python trace capabilities to generate the function call for specific state files. It takes the following form:
>>> LoadState("sample.pvsm",
              filenames = [

                # a `dict` object for each reader in statefile to update.
                {
                  "name": "[reader name as shown in the pipeline browser]",

                  # if multiple readers have the same name, 'id' may be used
                  # instead of 'name' where the value is "id" used in the
                  # state file for this reader.

                  # filename properties and their overridden values for this
                  # reader, for example:
                  "FileName" : "foo.vtk",
                },

                # multiple such `dict`s can be specified.
              ])

# here's an example
>>> LoadState(statefile,
              filenames=[
                  {
                      'name' : 'can.ex2',
                      'FileName' : data_dir + 'can.ex2',
                  },
                  {
                      'name' : 'dataset',
                      'FileName' : data_dir + 'disk_out_ref.ex2',
                  },
                  {
                      'name' : 'timeseries',
                      'FileName' : [ data_dir + 'dualSphereAnimation/dualSphereAnimation_P00T0000.vtp',
                                     data_dir + 'dualSphereAnimation/dualSphereAnimation_P00T0001.vtp',
                                     data_dir + 'dualSphereAnimation/dualSphereAnimation_P00T0002.vtp',
                                     data_dir + 'dualSphereAnimation/dualSphereAnimation_P00T0003.vtp',
                                     data_dir + 'dualSphereAnimation/dualSphereAnimation_P00T0004.vtp',
                                     data_dir + 'dualSphereAnimation/dualSphereAnimation_P00T0005.vtp',
                                     data_dir + 'dualSphereAnimation/dualSphereAnimation_P00T0006.vtp',
                                     data_dir + 'dualSphereAnimation/dualSphereAnimation_P00T0007.vtp',
                                     data_dir + 'dualSphereAnimation/dualSphereAnimation_P00T0008.vtp',
                                     data_dir + 'dualSphereAnimation/dualSphereAnimation_P00T0009.vtp',
                                     data_dir + 'dualSphereAnimation/dualSphereAnimation_P00T0010.vtp']
                  },
              ])
8.5. Extractors
Section 8.1 and Section 8.2 are two
ways of saving datasets and images using actions, i.e., you click a button (or in
Python, invoke a function) and the results are saved out immediately. If, for
example, you now want to generate the results for another timestep, you have to
repeat all the actions. One way to avoid this is to put together a Python script
to generate the data and image files and then use that as a macro. An easier
way is to use extractors .
Extractors are a type of pipeline
module, similar to sources and filters, but behave more like writers.
Similar to filters, they have inputs, unlike sources or filters, however, they
produce no output that can be consumed by another pipeline module. Instead,
when activated, they generate files – which we call extracts.
Since they are just another pipeline module, you use similar mechanisms
as sources and filters for creating and configuring these.
You use the Extractors menu to create them.
The Pipeline Browser shows all the extractors present
in the visualization.
You select one of them by clicking on it in the Pipeline Browser
at which point the Properties panel will update to show parameters on
the selected extractor.
There are two types of extractors: data extractors and image extractors. The former generate files from datasets produced by sources and filters, while the latter save out rendering results from views. When created, a data extractor by default uses the active source as the input (similar to filters) which an image extractor uses the active view instead.
8.5.1. Extractor Properties
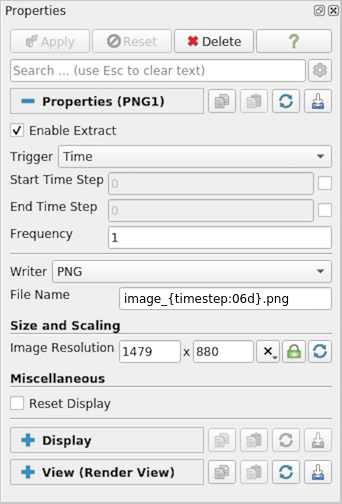
Fig. 8.9 Properties panel showing properties on an image extracts generator for PNG
files.
You use the Properties panel view and change extractor properties.
The available properties can be grouped into two major groups: first are
Trigger properties which are common to all extractors, and the second
are the Writer properties which are parameters specific to type of writer
the extractor uses.
Trigger properties define when the extractor
is activated i.e.
under what conditions does the extractor produce extracts. Currently, we
support time-based controls. You can select the
Start Time Step ,
End Time Step or the
Frequency at which to generate the results.
Frequency is the number of timesteps per activation thus to write every
other timestep, set the Frequency to 2, to write every 3rd timestep, set it
to 3, and so on.
Writer properties are specific to the writer. For data extractors,
these will be similar to the writer properties shown in the
Configure Writer dialog for the writer described
in Section Section 8.1. For
image extractors, they are similar to the Save Screenshot Options
dialog described in Section Section 8.2.1. The Writer
properties also lets you set a File Name . This is the file name to use to
save the extracts. Since extractors are designed to generate a new
extract every time they are activated, the File Name supports patterns that
let you make the filename unique per activation. {timestep} or {time} in the
filename are replaced by the timestep index and the time value for each
activation. You add leading zeros (or other prefixes) to the numbers using a
form such as {timestep:06d}. There the timestep will be padded with zeros if the
number of digits is less than 6. You should not use absolute paths for
specifying the filenames here. We will see how to select prefix to store these
extracts under in the next section.
8.5.2. Saving Extracts
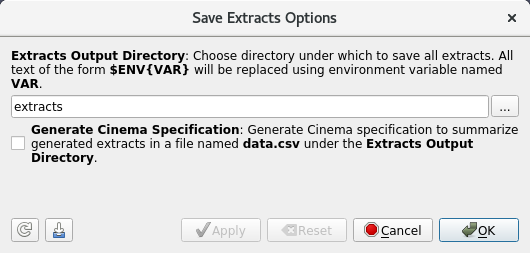
Fig. 8.10 Save Extracts Options dialog shown on File > Save Extracts….
Once the extractors have been setup, you can trigger the saving of
extract using File > Save Extracts…. This will pop up the
Save Extract Options dialog which lets you configure the extract generation.
Extracts Output Directory specifies the root directories under which all extracts are saved.
Check Generate Cinema Specification to generate a data.csv file under the chosen
extracts output directory that summarizes the generated extracts. This can be then used
with viewers provided by
the Cinema Science project to explore the generated extracts.
Hit Ok and ParaView will animate through all timesteps
(similar to using the VCR Controls), activating extractors based
on their trigger criteria and then generating extracts. On successful
completion you should have files under the chosen root directories.
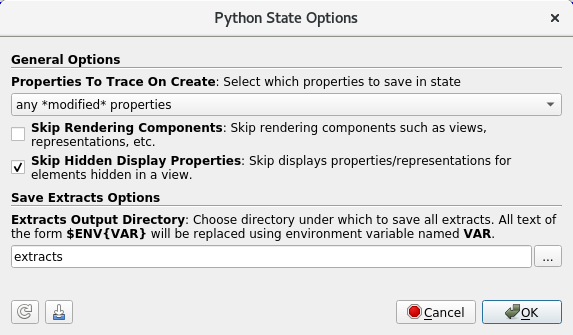
Fig. 8.11 Python State Options dialog shown when saving a Python state file using
File > Save State.
In addition to generating extracts using the GUI, you can use pvpython or pvbatch
to generate extract offline. Thus is especially handy for HPC use-cases; you can
setup your state using an interactive session and once done save out the state and
schedule a non-interactive job for the potentially time-consuming extract generation
stage. To do so, setup your visualization pipeline including the extractors
as normal. Then, instead of using Save Extracts , use
File > Save State…` and save out a Python state file.
The Python State Options dialog has a section similar to Save Extracts Options
dialog for choosing Extracts Output Directory and Generate Cinema Specification.
Click Ok to save the Python script. The Python script has a section near
the end of the end as follows:
if __name__ == '__main__':
    # generate extracts
    SaveExtracts(ExtractsOutputDirectory='extracts')
This is what causes the Python script to save the extracts when the script is executed using
pvbatch or pvpython.