9. Advanced: Animations
9.1. Introduction
This tutorial deals with advanced topics in animations.
9.2. The Animation View
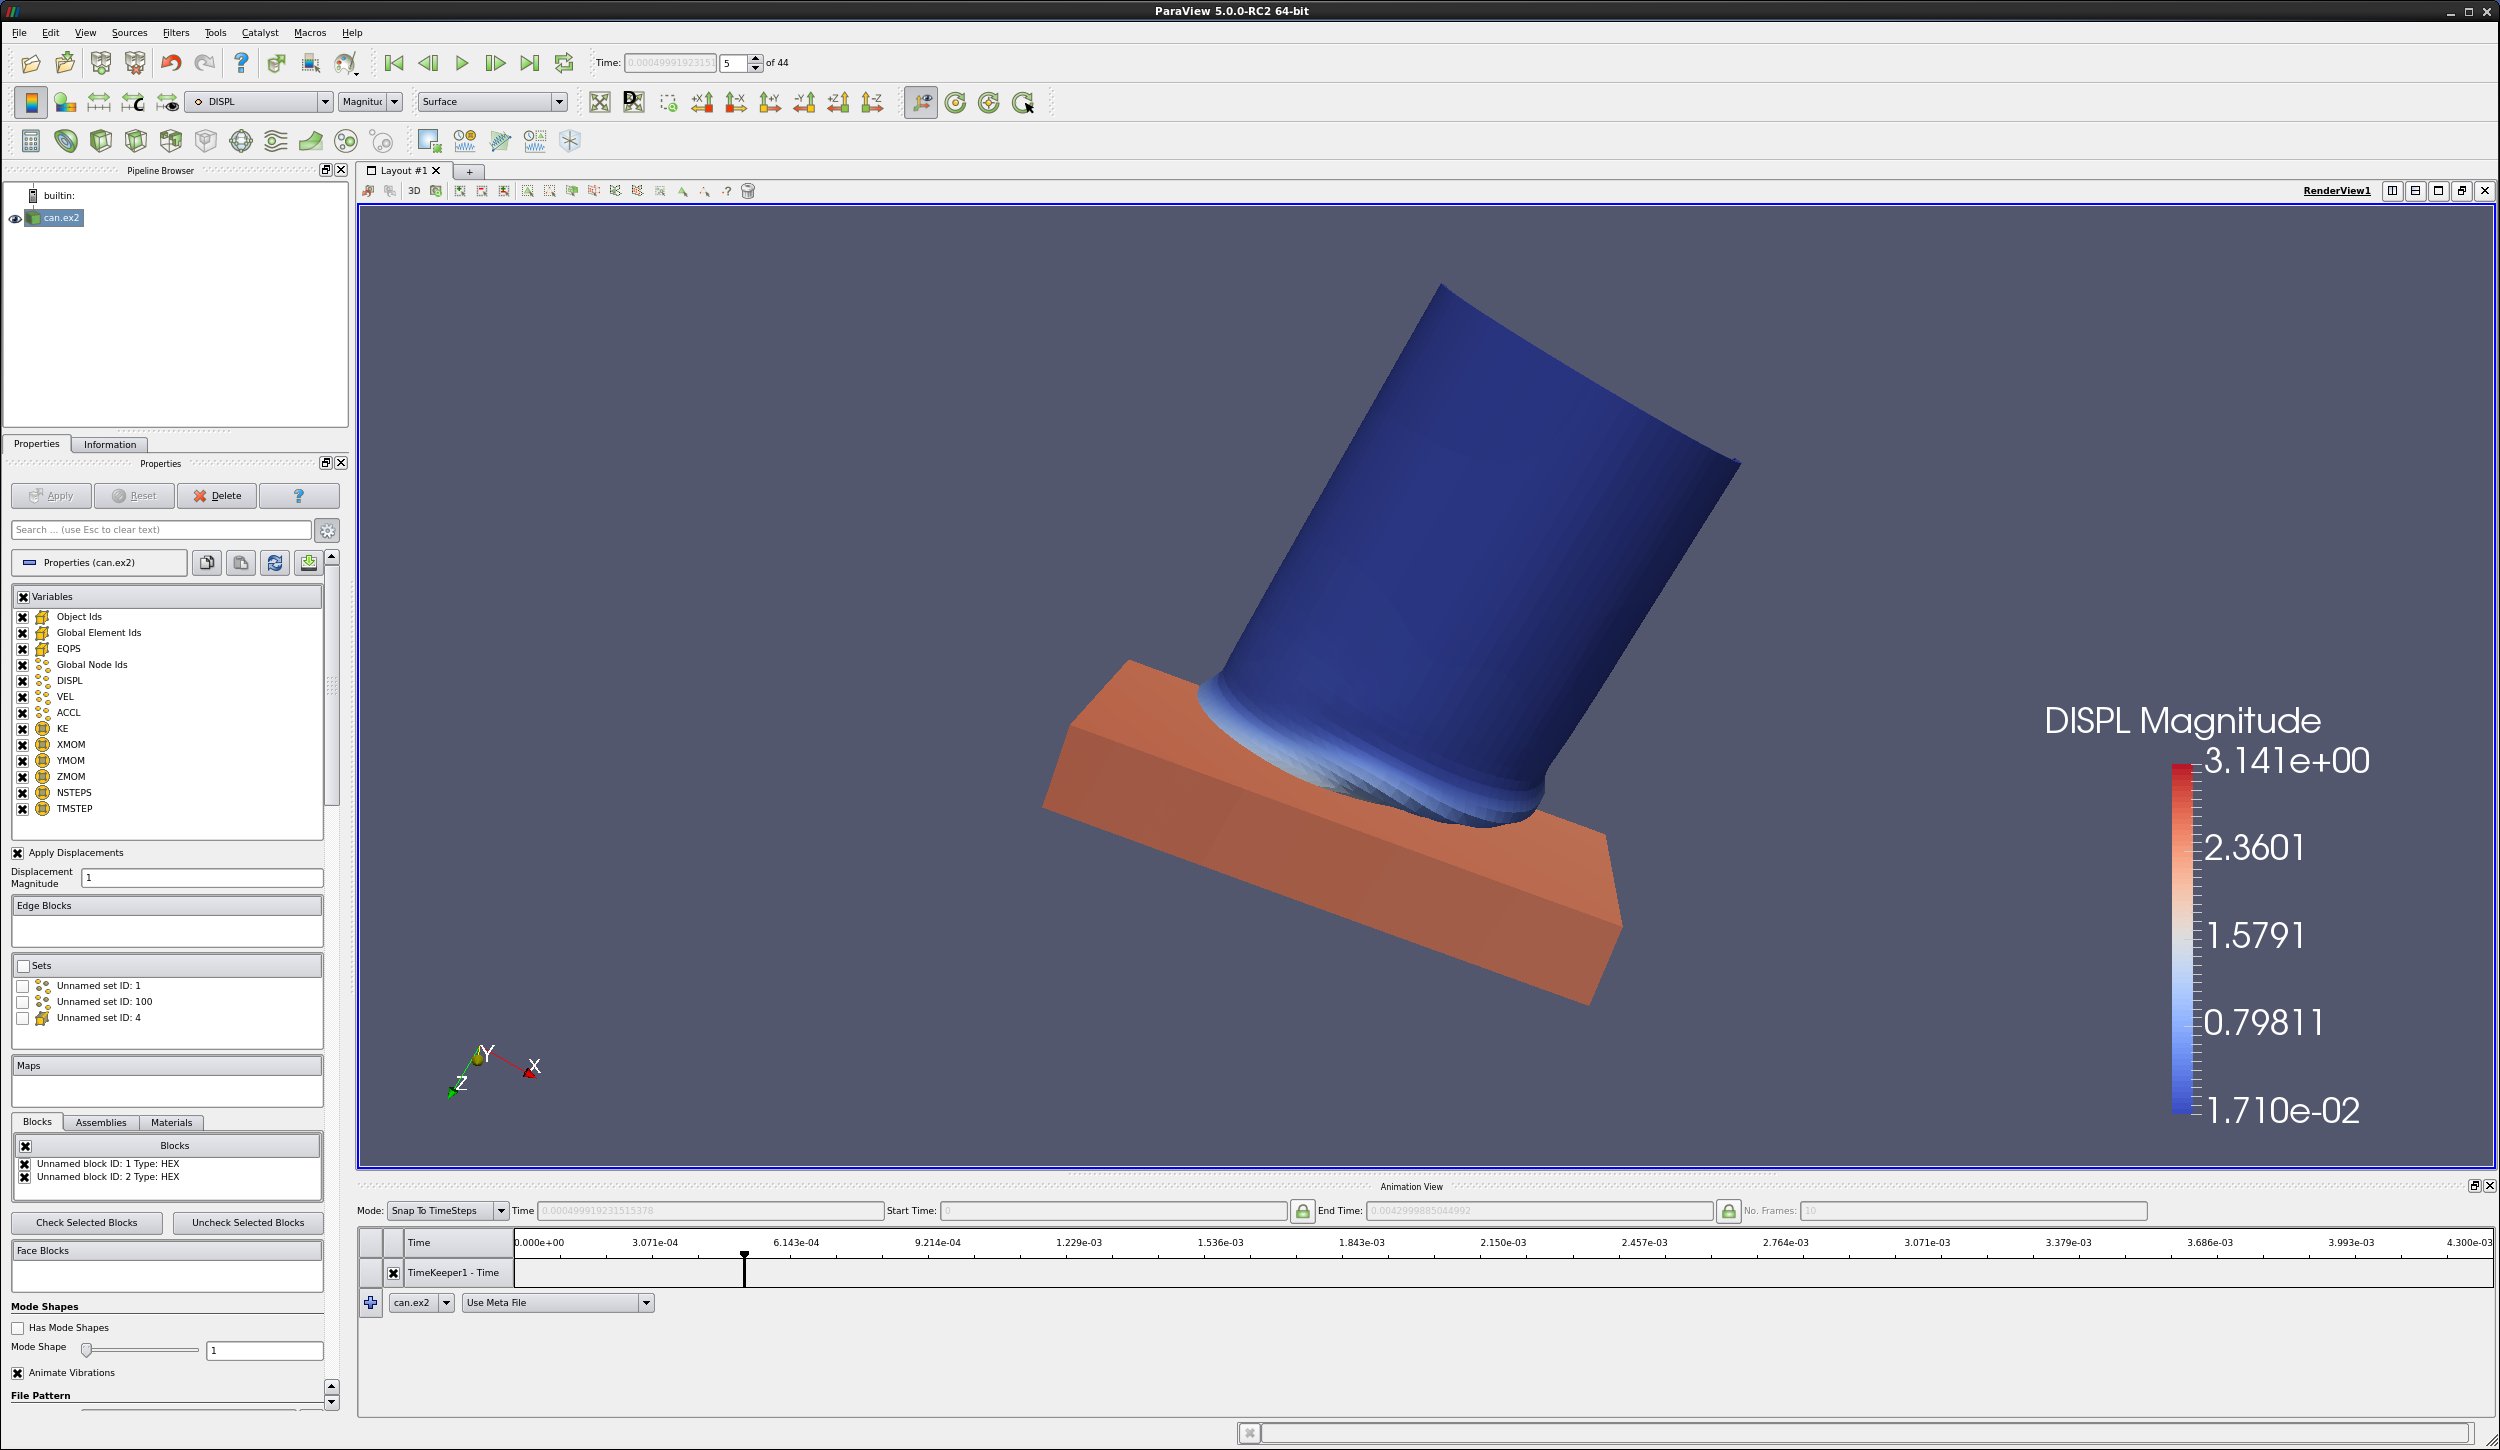
Open can.ex2.
Apply..
Drag the can around with the left mouse button.
Move forward to timestep number 5.
Set Coloring to DISPL.
Note: If you changed the order of the steps above, you may need to click Rescale to Data Range.
View → Animation View.
Grab the slider bar and move it back and forth.
9.3. Real Time
Note this functionality is deprecated
In the Animation View window, change the mode to Real Time, and the Duration to 100.
Play. Notice that the can motion is now very slow. We are saying that we want the whole animation to last 100 seconds.
Note: This can also be used to speed up datasets with a large number of time steps. Set the Duration to 10, and
paraviewwill animate over all time in 10 seconds. Obviously, this depends on the whetherparaviewcan keep up with this frame rate!
9.4. Temporal Interpolator
In the Animation View window, change the mode to Sequence, and the Nunber of Frames to 200.
Filters → Temporal → Temporal Interpolator.
Play. Notice that the can motion is now smooth.
paraviewis interpolating between frames, and making 200 time steps.Note that this only works with data that has a constant mesh through the whole time sequence. AMR (Adaptive Mesh Refinement) data does not work with the Temporal Interpolator.
9.5. Move the camera
There are four ways to move the camera. they are:
Orbit
Follow Data
Interpolate Camera Locations
Follow Path
9.5.1. Orbit Camera
We are going to make the camera rotate around our data.
Edit → Reset Session.
Open can.ex2.
Apply.
+Y.
View → Animation View.
Add a camera. Default motion is Orbit.
Click the blue +.
A Create Orbit dialog will appear.
Take the defaults.
OK.
Play.
9.5.2. Camera Follow Data
We are going to make the camera follow the data.
Edit → Reset Session.
Open can.ex2.
Apply.
+Y.
View → Animation View.
Add a camera. Change Orbit to Follow Data. Click the blue +.
Play.
Did you know?
The follow data option will follow the data from whatever filter is highlighted. This means that you can choose one cell, run the Extract Selection filter, and follow this cell. Note that you must keep visibility on for this cell. If needed, you can turn the cell’s Opacity in the Properties tab to 1%, making it disappear. By turning visibility on for your whole dataset, you can follow the cell but display all of your data.
9.5.3. Interpolate Camera Location
We are going to move the camera along a straight line. We want to move the camera to follow the can.
Edit → Reset Session.
Open can.ex2.
Apply.
+Y.
View → Animation View.
Add a camera. Change Orbit to Interpolate Camera Position.
Click the blue +.
Left click on the white section of the camera row that just appeared.
An Animation Keyframes dialog will open.
Left click the top Position.
Use Current.
OK
Play to the last timestep.
Move the can dataset back into the center of the screen. Tip - Don’t hit Reset.
Left click the bottom Position.
Use Current.
OK.
OK.
Play.
You can also create an intermediate destination for the can by going to the Animation Keyframes dialog, and selecting New. Then, follow the directions above. Experiment by adding more keyframes and different camera angles.
A way to create tracks in 3d space for use with Interpolate Camera Location is to create the points external to Interpolate Camera Location, and then copy them into place. One way to create these external points is to use a Sources/ Plane. Orient the plane in the 2d plane you want the camera to track. Now, create a Spline source. Create additional control points, and selecting each control point, use the p key to place them on the plane. Copy these points into the Interpolate Camera Location controls.
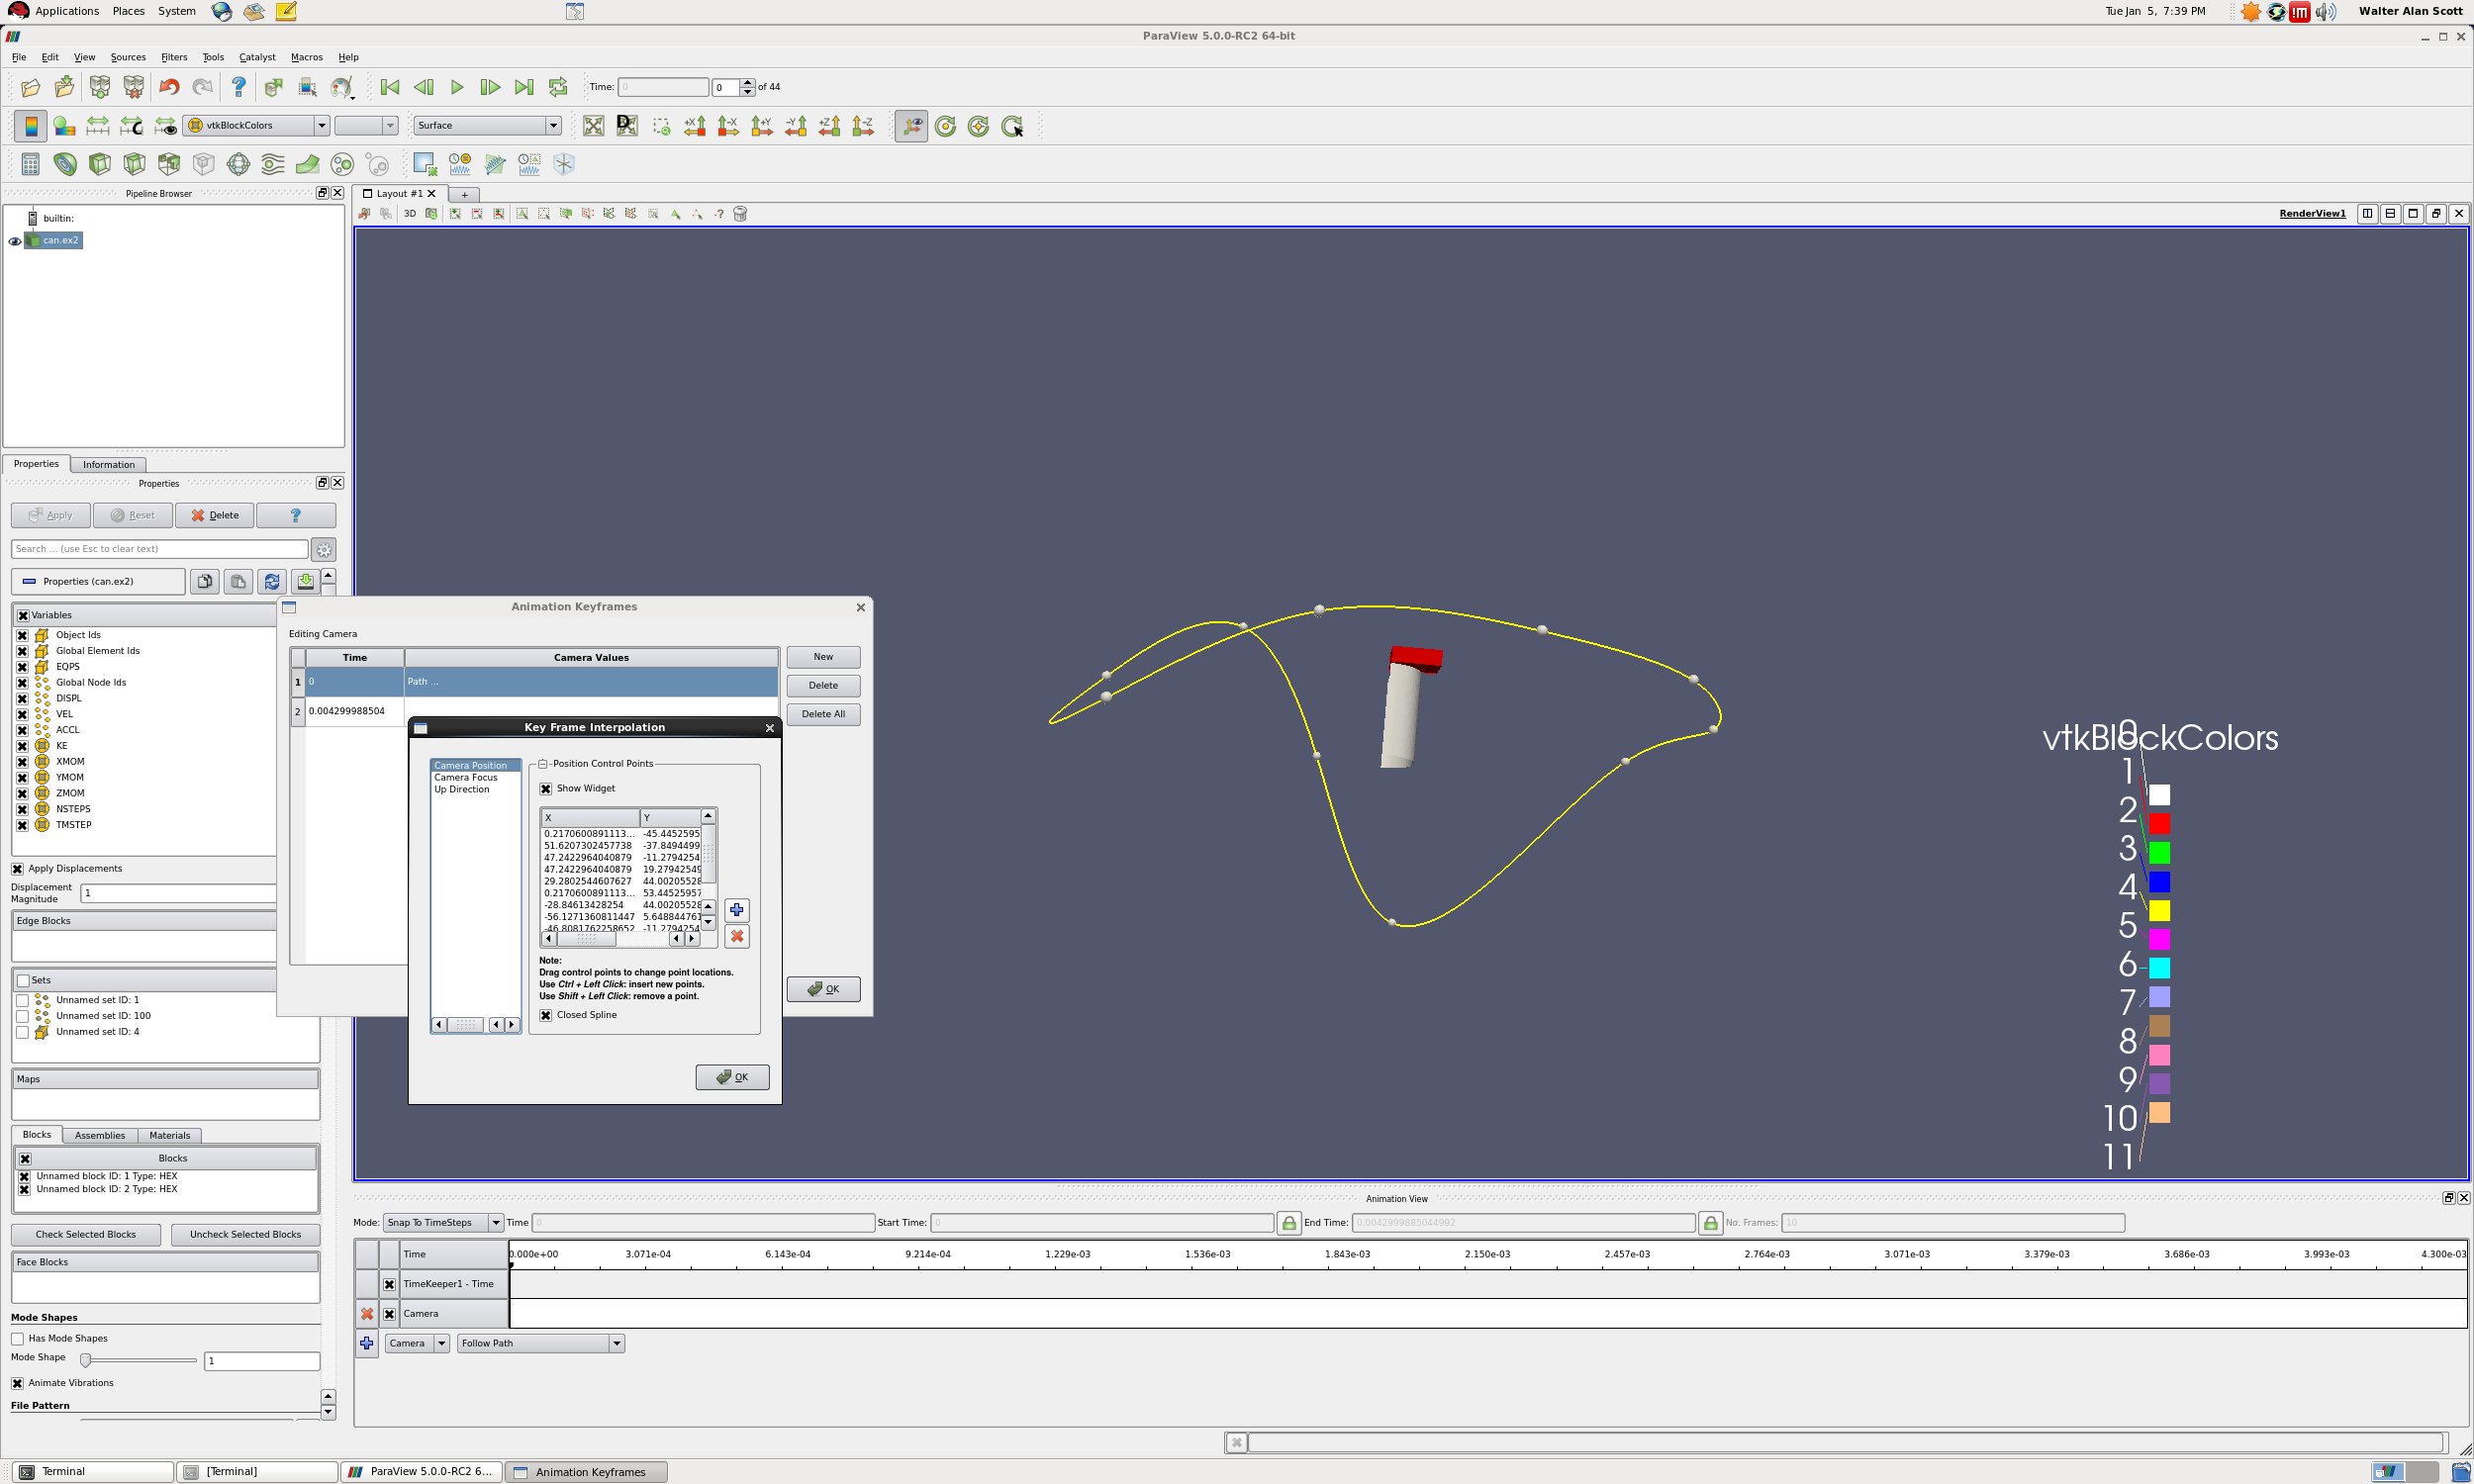
9.5.4. Follow Path
We are going to move the camera along a spline. Advanced operation.
Edit → Reset Session.
Open can.ex2.
Apply.
+Y.
View → Animation View.
Add a camera. Change Orbit to Follow Path.
Click the blue +.
Left click on the white section of the camera row that just appeared.
An Animation Keyframes dialog will open.
Left click on Path.
Click on Camera Position.
Now, in the 3d view, zoom out.
Rotate the can. You will see a yellow circle with white spheres.
Drag the spheres around.
OK.
OK.
Play.
One way to create tracks in 3d space for Follow Path is to use the same procedure listed above for Interpolate Camera Location.
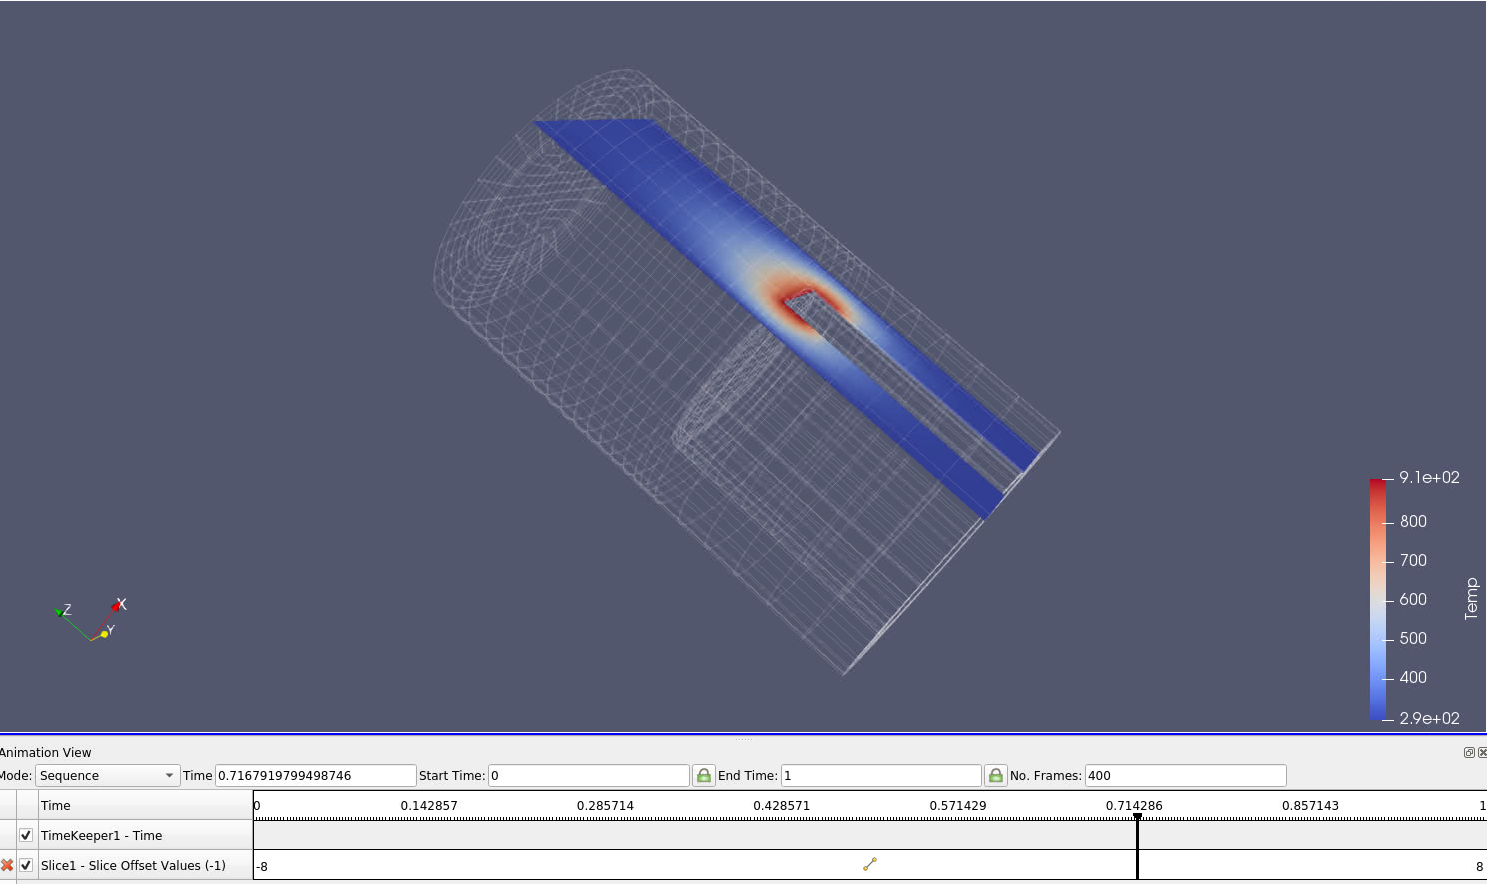
9.6. Animating a Filter
In the previous example we showed how to manipulate the camera using the Animation View tools. In this example we will show how to animate a filter. Our goal is to move a slice through our dataset over time.
Lets start from scratch. One way is to go Edit → Reset Session.
Ok.
If you closed it, bring up the Animation View.
Open disk_out_ref.ex2.
Apply.
Select Slice filter.
Apply.
Turn off the Show Plane.
In the Animation View, change Mode to Sequence, and number of frames to 400.
We want to create a Slice track.
Slice Offset Values.
Click the blue +.
Double click on the track. This will bring up a dialog, and will set the start and end.
Change the starting value to -8 and the ending value to 8.
Play.
9.7. Data Animation
In this example we will show how to animate your dataset. Our goal is to show one dataset, then fade into another dataset. This can be handy when one physics simulation runs for an early time period, and another physics simulation runs for the later time period.
Lets start from scratch. One way is to go Edit → Reset Session.
OK.
If you closed it, bring up the Animation View.
Open can.ex2.
Apply.
Open can.ex2 again.
Apply.
Select the upper can.ex2.
Set Coloring to DISPL.
Go the last time step.
Rescale to Data Range.
Go to first time step.
Select the lower can.ex2.
Change the representation to Wireframe.
We now want to fade from the first version of the can to the second version of the can. This is done as follows:
On the Animation View, on the can.ex2 pulldown menu, select the upper can.ex2.
Right of there, use the pulldown menu to select Opacity.
Click the blue +.
Do the same for the lower can.ex2.
Click on the upper can.ex2 white horizontal bar.
Double click on the upper value, change it to 1.
Double click the lower value, change it to 0.
OK.
Play.
You can substitute Visibility for Opacity when you add tracks to the Animation View. Then, on one dataset, you can run visibility of 1 for half of your time, and run visibility of 1 for the other dataset for the second half of your time. Thus, you will show the first simulation for the first half of your animation, and the second simulation for the second half.
9.8. Warp Vector Filter
If your dataset has displacement data, but it is not using a variable name that ParaView recognizes, you can still animate your data. Choose the Filters → Alphabetical → Warp Vector filter.